The older we get, the more often we remark that nothing stays the same. This is especially true when it comes to mortars used in masonry construction. The differences we see in the material components and strength properties between mortars from historic buildings and those found in modern construction are nothing short of remarkable. This can present challenges for the repair or restoration of historic structures.
Mortar unifies the units of masonry, such as bricks and stone, and also repels the elements from the interior. Mortars used in antiquity were relatively simple—most consisted of sand and lime. Over time, mortars began to include cements, natural pozzolans and water repellent chemicals. Using repair mortars with incompatible compositions and proportions on a historic building can change the response of the building façade to temperature and moisture, resulting in unwanted distress. For this reason, it is important to fully analyze and define the components in the original mortar prior to initiating a repair.
We at AET are often hired to analyze mortars from a historic building. For the most part, we are asked to analyze mortars for two reasons: 1) to explain the failure cause(s), or 2) to match mortar compositions/proportions for historic restoration work. In the first case, our job is to explain why a mortar is not performing as expected. In the second case, the client simply wants our laboratory to provide data on the original mortar composition/proportion and that could include recommendations for a match. In either case, the outcome of our work depends heavily upon the quality of the samples.
The client is best served when our experts and engineers visit the site to observe the masonry construction and:
-
- Record the age, nature, location, existing condition and extent of the mortar distress.
- Document whether or not the mortar has gone through previous repairs with similar or different mortars.
- Note mortar conditions between areas of original construction and later additions.
- Collect appropriately sized samples from proper locations and of dissimilar composition materials for laboratory and petrographic analysis.
- Define the extent of the repairs and the proposed materials (constituents and proportions) the client is considering for the restoration.
Step #1: Plan for Quality Samples
Before leaving for the site, there are several steps you can take that will help you obtain useful samples. First, be sure to explain the purpose of the testing to everyone on your team who is involved in the mortar sampling and analysis. This will help if there are questions when at the job site.
Second, judge how many different types of mortar have been used, and determine where and how many samples should be taken. For failure analysis, at least two samples are critical: one of the failure area, and one of an area that is performing as expected. Often, the best way to determine the cause of a failure is by finding the differences between the working and non-working areas. For historic mortar analysis, one sample is the minimum, but more samples from different sides or areas of the building will usually lead to a much greater understanding of the historic conditions. For example, if one kind of mortar was used on the common bricks on the sides of the building, the mortar might not be a good match for the ornate bricks used for the front of the structure.
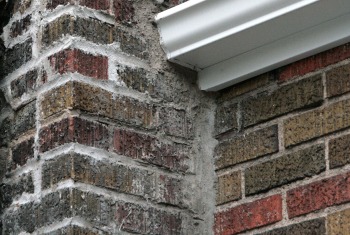
When arriving at the site, the sampler(s) should walk around the building to identify alterations, additions and the appropriate locations for sampling. It is very important that the correct mortar is sampled where multiple mortars have been incorporated into the building envelope. Many historic buildings have newer mortars that were applied on top of its historic mortars (see figure to the right). If the newer mortar needs to be analyzed for failures, it is critical to get good samples of the top mortar. On the other hand, the top mortar would need to be removed in the sampling areas if you wanted to know about the historic mortar underneath. Similarly, if a historic mortar sample is needed, it needs to come from the original historic building, not from a later addition. Whenever possible, we recommend that at least one of the sampling personnel have experience with obtaining representative samples of historic masonry.
Step #2: Determine the Best Sampling Technique
It can be difficult to get intact, good-quality mortar samples. This is especially true if the mortar is older and the samplers are limited in the amount of damage they can do to the masonry when taking the samples. The least damaging method is to use a hammer and chisel, but this is least likely to get large, intact samples. Working inward from an exterior corner might help. In wide joints, careful removal of the mortar at the top and bottom of the joint can produce solid samples. Another common method is to core a section of mortar and masonry units. The coring should be done on a bed (horizontal) joint to limit damage to just two masonry units. Perhaps the preferred method is to use a mason to remove a large section of brickwork with the intention of later re-laying the bricks. After removal, the bricks can be easily separated, leaving large samples on one face or another. The area should be well documented photographically beforehand so later reconstruction will be accurate.
Step #3: Follow Best Practices When Submitting Your Samples
Mortar samples should be at least 100 grams. That is about a palm-sized solid piece of mortar measuring about three-eighths of an inch (ten millimeters) thick. Solid pieces are highly recommended, as they are necessary for petrographic examination of the mortar and can be crushed into a powder for chemical analysis. Samples should be placed in a bag, and the bag should be labeled with the sample identification, location and date. Powdered samples should be put into paper envelopes because it is hard to recover the entire powdered sample from plastic bags. If you must place a label on the sample itself, use a pencil (permanent markers can interfere with the results of the chemical analyses). If necessary, identify the outside edge of the mortar sample. Take steps to pad samples during transport to minimize breakage, and tie or tape core samples together (with masking tape) so that the mortar is protected.
In addition, be sure to include a few basic photographs. There should be at least one showing each area that was sampled along with at least one wide angle of view to show from which part of the building the samples were derived. Other building documentation, such as plans, elevations, or hand drawings showing details and failure areas, are usually helpful in diagnosing mortar problems.
Final Thoughts
Sampling mortar is not a one size fits all operation. Careful consideration needs to go into the reason(s) for sampling, the number and location of samples, and the quality of samples. By following these steps, you are much more likely to get the information you need for a successful, on-time project.
For questions about historic preservation and historic mortar evaluation and matching, please contact one of our professionals here.
Sources (in addition to the author’s experience): Hughes, John J., and Kristof Callebaut. “Practical sampling of historic mortars.” In RILEM International Workshop,’Historic Mortars: Characteristics and tests’, PJM Bartos, CJWP Groot and JJ Hughes (eds.), RILEM proceedings PRO, vol. 12, pp. 17-26. 2000.